Outdoor Sauna 101: Awesome Build from Start to Finish
Maybe this is the year you’ll finally get that outdoor sauna you’ve been dreaming of?
“But they’re so expensive,” you might be telling yourself, “and I don’t have the skills to build it myself.”
What if you bought an outdoor sauna kit? That way you’ll save money and don’t require a ton of building experience.
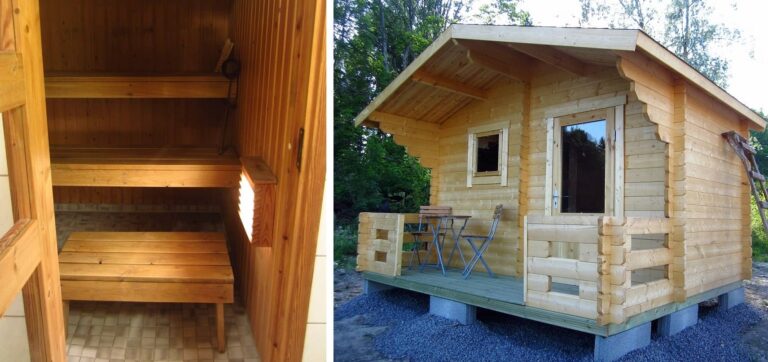
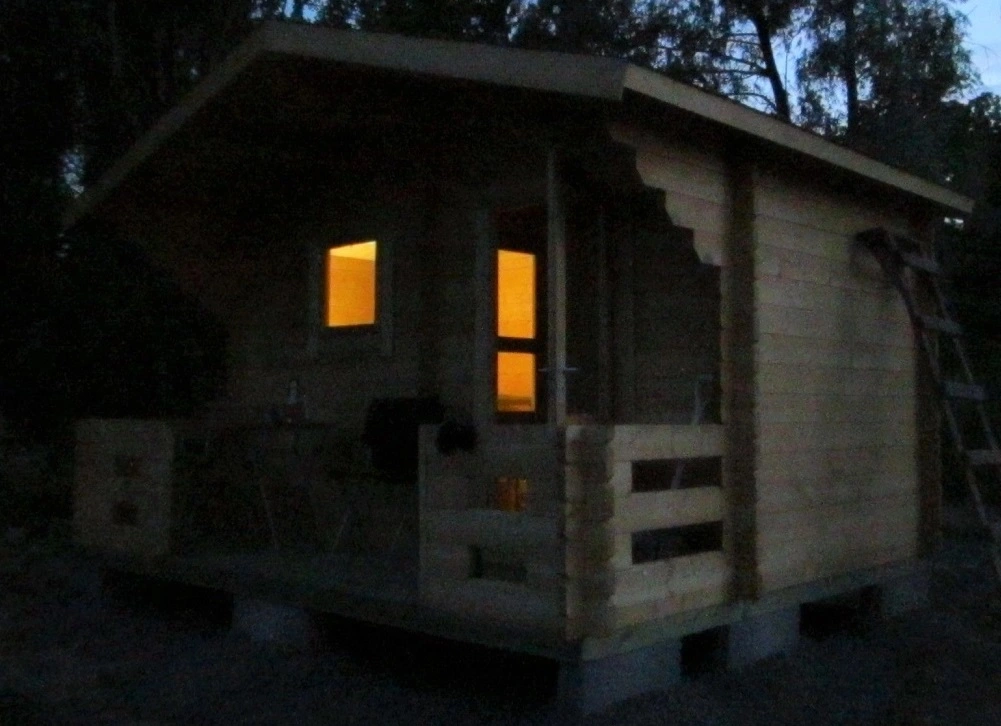
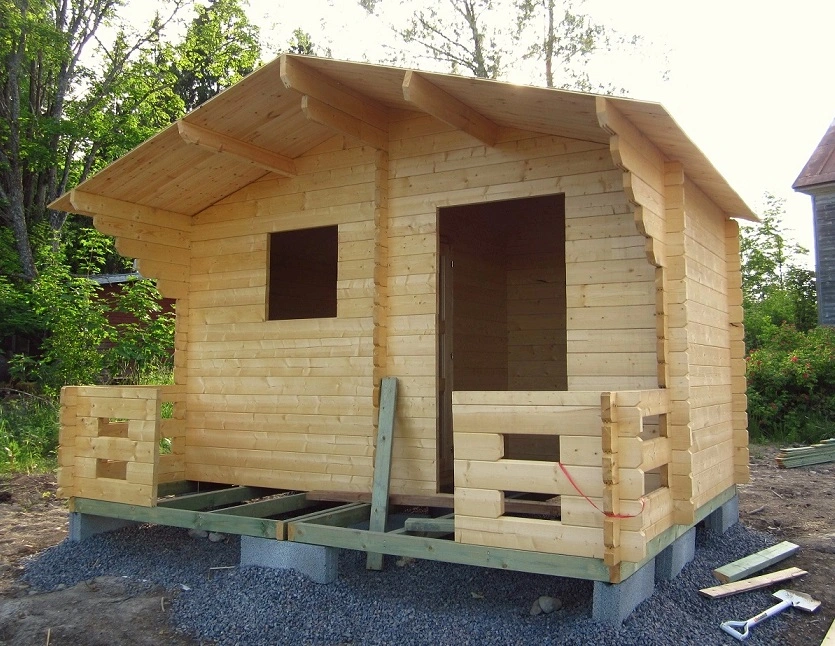
That’s what I decided to do: I bought an outdoor sauna kit, had it delivered to our property, and then my dad and I built this beauty:

In this article, I’ll show you the whole building process from start to finish (with lots of pictures), answer many relevant questions, and emphasize the most important steps so that your future sauna won’t get moldy in a few years but will serve you for decades to come!
Is It Worth Getting an Outdoor Sauna?
Yes, it is. An outdoor sauna is the best option when:
🔶 you don’t have enough space for an indoor sauna but have plenty of room on your (back)yard
🔶 you prefer a wood-burning stove to an electric sauna heater
🔶 you like older traditions (i.e., old times when electricity wasn’t still widely available)
🔶 you have easy access to firewood
Do outdoor saunas need electricity? They don’t, which is one of their biggest pros.
Wood-burning stoves obviously don’t require electricity, and if you like to sauna when it’s dark, there are many great options for lights that are waterproof and battery-operated (pro tip: camping stores have the best selection).
We wanted a sauna with no electricity; below you can see how well just one battery-operated lamp lights the sauna room (I bought two but even one is efficient enough):
Are outdoor saunas expensive to run? After the initial investment, running an outdoor sauna can be totally free, but only if you can get enough wood from your own property.
Firewood can be expensive, especially if you can’t get it locally, so this is something to consider before getting an outdoor sauna.
Is It Cheaper to Build Your Own Sauna?
Without a doubt, yes it is.
Like with all buildings, the material costs make up just a fraction of what the entire build costs as labor is the most expensive part – and rightfully so.
Building a sauna yourself will thus save you a lot of money.
That doesn’t, however, mean that you could easily create your own DIY outdoor sauna kit, which is something sauna manufacturers do much more professionally and with needed expertise.
That’s exactly why a sauna kit is so perfect: you’re saving money and building yourself, but you’re not building from scratch, which is good because most people don’t know how to build a sauna correctly.
Outdoor Sauna Build from Start to Finish (with a Kit)
Building a sauna naturally starts with a foundation. It should be as level as possible and constructed like this with blocks of concrete and plenty of gravel:

This step, unfortunately, is where most people get it wrong: they place the sauna directly on the ground or even worse, dig a hole for it.
Then again, you can’t blame amateur builders since so many sauna sellers also feature their saunas laid directly on the ground (some of those pictures are AI-generated, though, and shouldn’t be used as literal instructions).
By now, the humankind definitely has enough building history to know what happens to any wooden building when it’s placed directly on the ground which, in most cases, is moist or even wet possibly all year round: the floor becomes moldy.
As years pass, the floor will get soft as it keeps decomposing, leaving your sauna ruined.
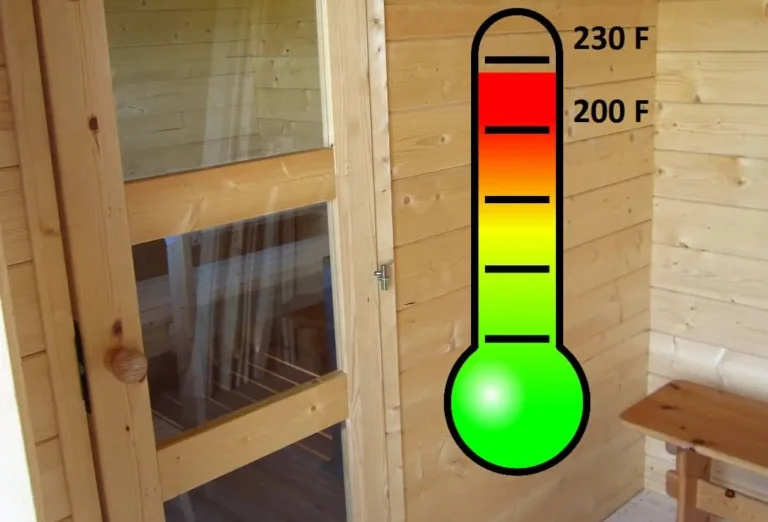
This fact is only emphasized in saunas since so much water is used compared to a wooden shed, for example. (And yes, you are supposed to throw many ladles of water frequently on the hot sauna rocks, and forget about the dry sauna nonsense that’s so prevalent especially in the US.)
So, you absolutely want to lift the sauna up for these two reasons:
✅ air needs to be able to circulate fully at floor level, keeping the sauna dry when not used
✅ sauna water needs to be able to drain easily
Sometimes you see people using concrete slabs with their sauna builds, which helps a little (as there’s at least something in between the ground and your sauna floor), but any outdoor sauna too close to the ground is still always a red flag and will likely lead to mildew sooner or later.
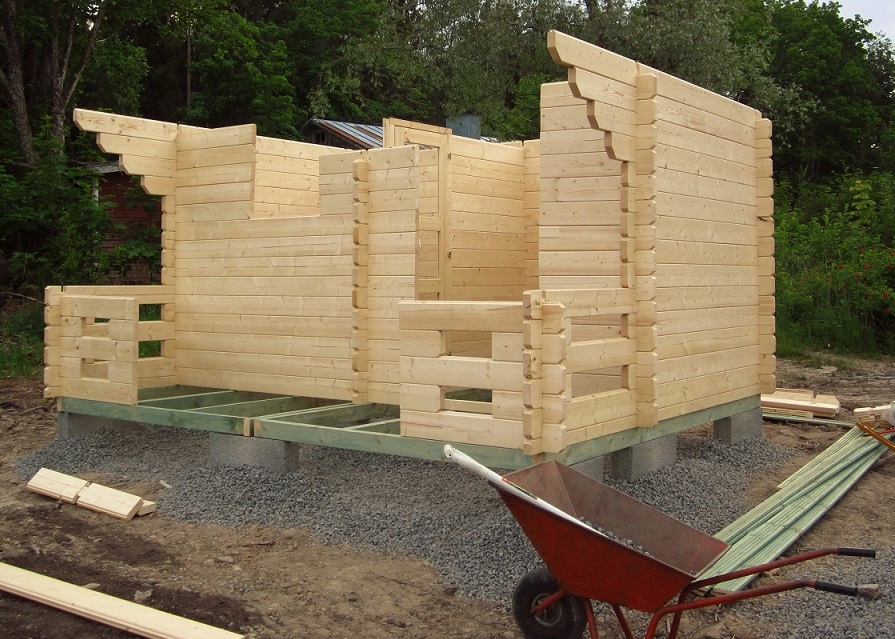
Now we get to the fun part!
Above you can see how many wall timbers my dad and I were able to stack in one day.
This phase is one of the easiest as you really just stack the materials in the right order. The walls don’t require any nails or screws.
The green pieces you see above are made of impregnated wood and meant for the foundation. This relates to the mold I just wrote about; treating the wood closest to the ground with chemicals protects it from fungi and mildew. These pieces came with the kit.
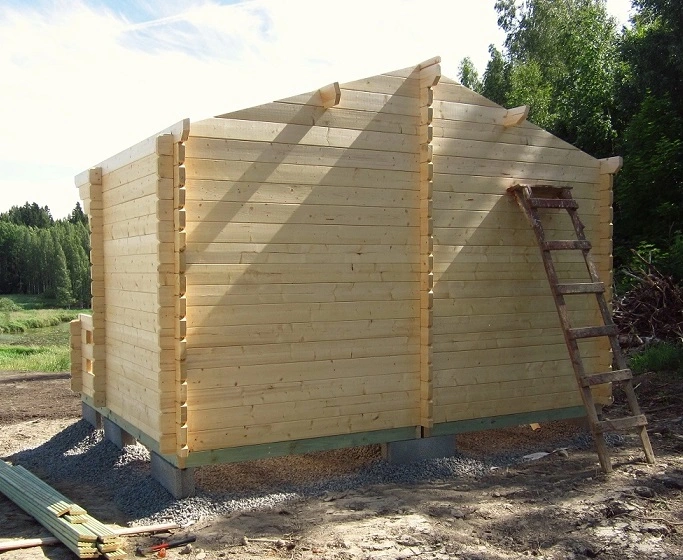
Building the walls gets even easier when you start reaching the top: you have less materials left, so you’ll find the correct pieces more quickly than before.

Above the walls are finished.
We bought some insulating wool to be used in between the sauna ceiling and roof.
While the dressing room on the right had only one set of plank wood, functioning as both the roof and ceiling, the sauna room had its own, separate ceiling and roof planks in the kit.
This meant we had a chance to insulate the ceiling, which is a smart move: warmer air rises up while cooler air stays down (not just in saunas, but even in fridges and freezers), so it makes sense to not let the heat escape as easily.
Should you insulate the entire sauna? The answer is no. You certainly can, but it’s not necessary.
Some sauna sellers market insulation as “bringing extra comfort,” which is a little silly as it can be true only in one situation: if you live in a country or state that has proper winters, your outdoor sauna will be very cold when you enter it to heat it during wintertime.
If your sauna is insulated, it will still be cold but slightly less cold. Once the fire is going, your sauna will heat up quickly, meaning that insulation won’t bring any comfort after your sauna is warm and hot.
With insulation, your sauna will stay warmer for longer after saunaing, but who needs or benefits from that warmth?
While an indoor sauna distributes some of its warmth to your home, which can be beneficial and wanted during winter, the warmth from an outdoor sauna after saunaing goes to waste.
Insulation also costs extra and may be an add-on to the sauna kit of your choice, so just know you can sauna happily without it.
It’s an energy-saving decision to insulate the ceiling, though!
Moving on with the build, above the sauna has ceiling and roof boards screwed in place.
Building the sauna room ceiling and then the entire roof was a lot slower than building the walls. It’s not unusual to have to measure and cut a few boards yourself even though they’re supposed to be ready to use straight out of the package.
My dad’s table saw came in handy for this phase.
Sauna kits may come with nails like ours did, but we used screws instead for firmer grip.
Then it was time for the actual roofing.
Our sauna kit came with self-adhesive asphalt shingles, some of which you had to cut yourself. I watched a YouTube tutorial on how to install them and was soon confident I could do it.
The kit came with felt nails for the roofing, so I wanted to be sure I wasn’t nailing the shingles in the wrong spots; as you progress row by row, the nail you use for the previous piece always gets covered with a new piece (= this way most nails won’t show, and it becomes less likely the roof would leak in the future).
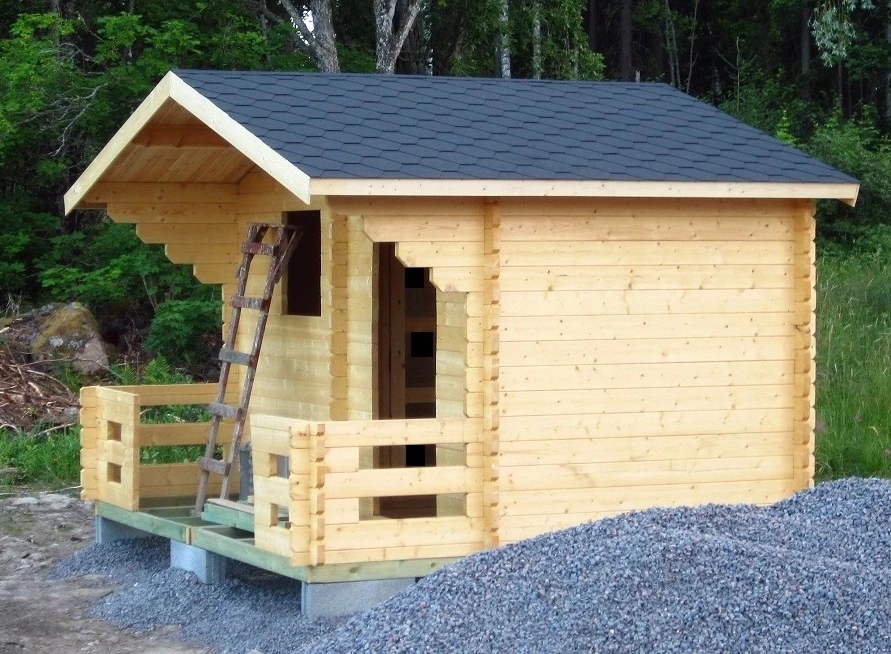
When installing the roof, it was really warm and sunny, which led to the shingles melting. Only two pieces got destroyed as they turned into black, thick goo. I covered the rest of the shingles with a huge slab of polystyrene and was able to stop the melting.
I was really happy with the end result!
It took me two long days to finish the roof, and I even sprained my ankle while building it (= the angle of the roof is so steep that my ankle couldn’t take any more extreme bending).
I was alone that day, so it was a nightmare getting down from the roof as my other leg was trembling from stress and had a limp ankle! 😅 Luckily I managed to come down with no further injuries.
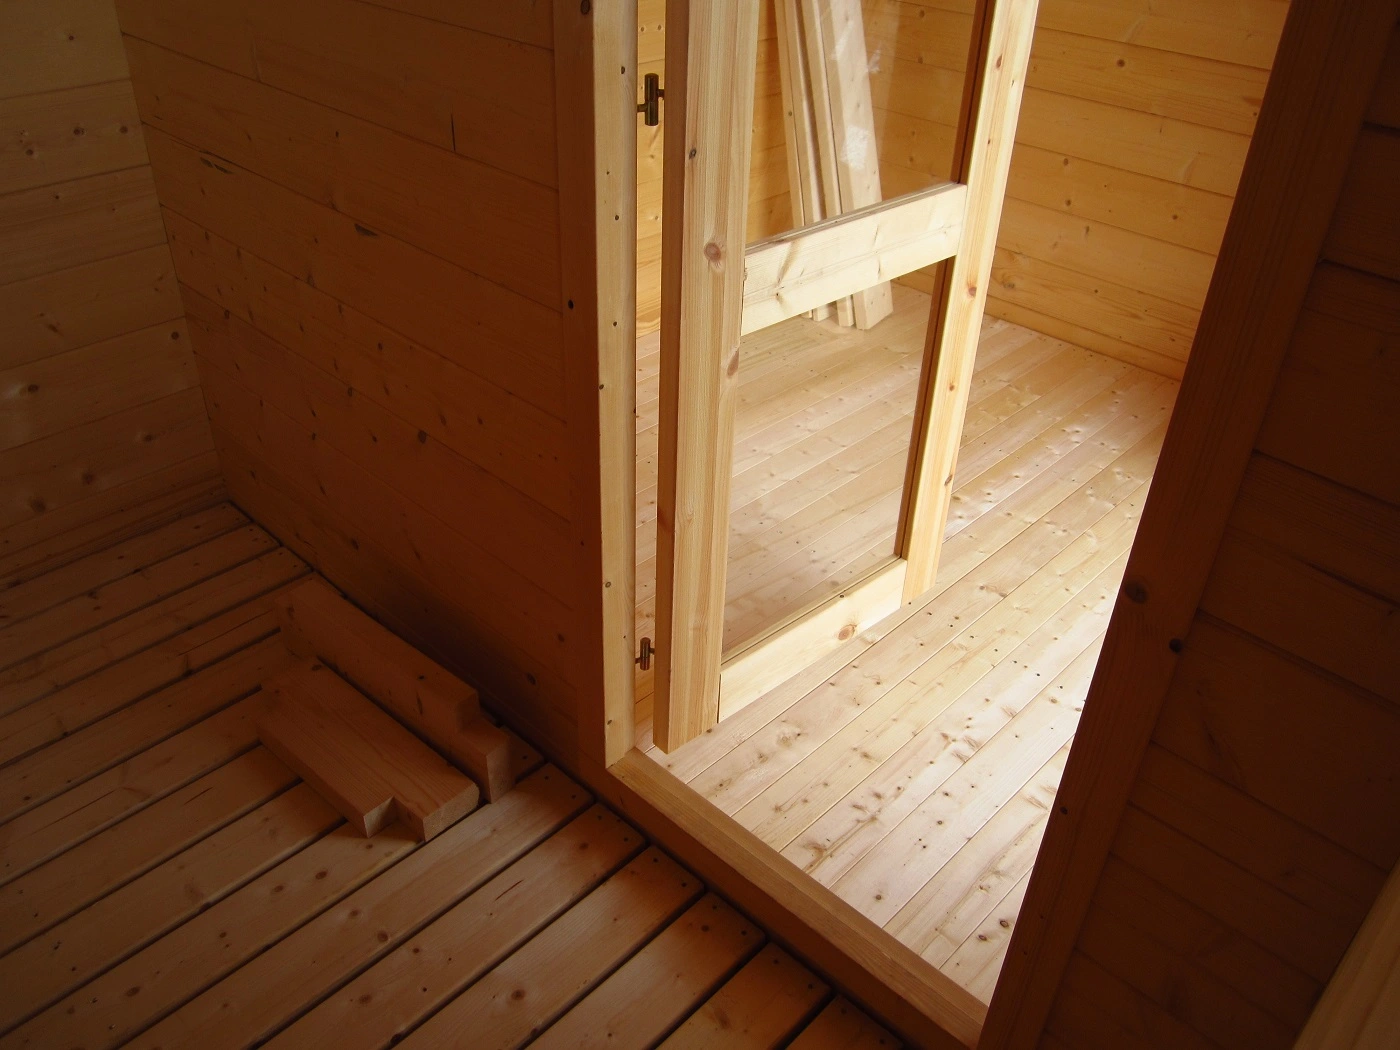
At this point, most of the outer surfaces were done (except for the deck), so it was time to move indoors.
Next Steps: Sauna Floor, Benches, Stove, and Chimney
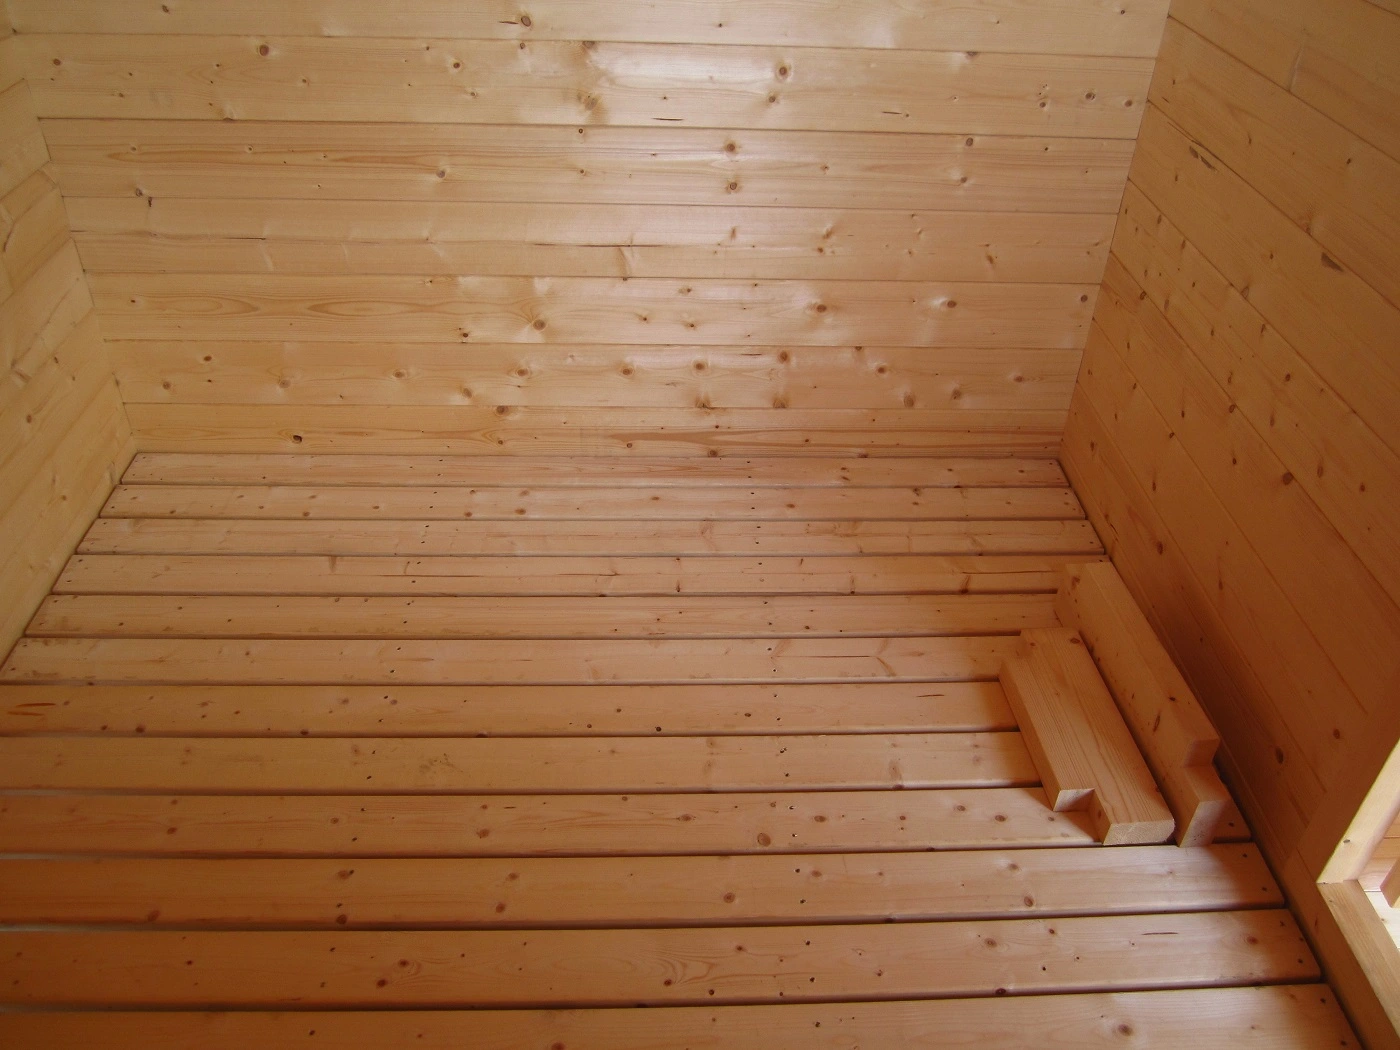
Finally it was time to build the floor.
As seen above, our sauna kit came with two kinds of floorboards: the sturdier ones were meant for the sauna room while the thinner tongue and groove planks were for the dressing room.
Some of the floorboards needed measuring and sawing just like the ceiling ones had, but in general it’s a lot easier (on your upper body) to build floors than ceilings.
I read about best sauna floor solutions from Finnish sources and found that a slatted floor is one of them. It not only lets water drain easily but also helps with ventilation, fresh air intake, and keeping the floor clean.
A slatted floor is very easy to build: you just measure the wanted gaps by placing a pen, for instance, vertically in between every board. That way every gap will be as narrow or wide as you want.
As the frame was finally built, it was time to install the sauna benches.
When talking about seating, saunas traditionally have three levels: two benches and a stool. This setting is as common in outdoor as it is in indoor saunas.
In our sauna kit, the benches came ready-built, so we just had to secure them on the walls. The stool, however, required assembling.
When choosing your own sauna kit, pay attention to the benches. The cheapest kits come with only one bench, which is never as good as at least two tiers which allow you, your friends, and family members to choose how high or low to sit: the higher, the hotter.

How to Reduce Clearances
At this point of the build, it was time to prep the right corner of the sauna room for the sauna stove.
With wood-burning stoves, you either have to buy heat shields for the stove itself or protect the walls around the stove. I found heat shields cost a lot more than protecting the walls, so I opted for the latter.
Any large sheets or boards made of non-combustible materials, such as fiber cement, will work perfectly as they’re also waterproof.
Without protecting the walls or buying heat shields, you can’t install the stove near a wall or in a corner because the required fire-prevention distances are so massive.
With double protection (= two boards on top of each other on both sides of the corner) you can safely place the stove exactly where you want. We used double protection.
Our sauna kit didn’t come with any sort of heat protection so we bought the non-combustible boards separately.

Sauna Stove & Chimney
What about the actual wood burning stove for outdoor sauna? Are stoves even sold as part of outdoor sauna kits?
You can buy outdoor sauna kits either with or without the stove and chimney. The latter option is great if you want a different stove than certain kits come with or if you happen to be someone like me and want to repair old stuff you already have.
I had been debating whether to buy a new stove or give a makeover to an old Harvia sauna stove we had in an older sauna on our property.
I decided to give the old stove a chance by cleaning the rust off with a wire brush and then painting it with heat-resistant paint meant for fireplaces and such.
And ah, the transformation was this gorgeous:
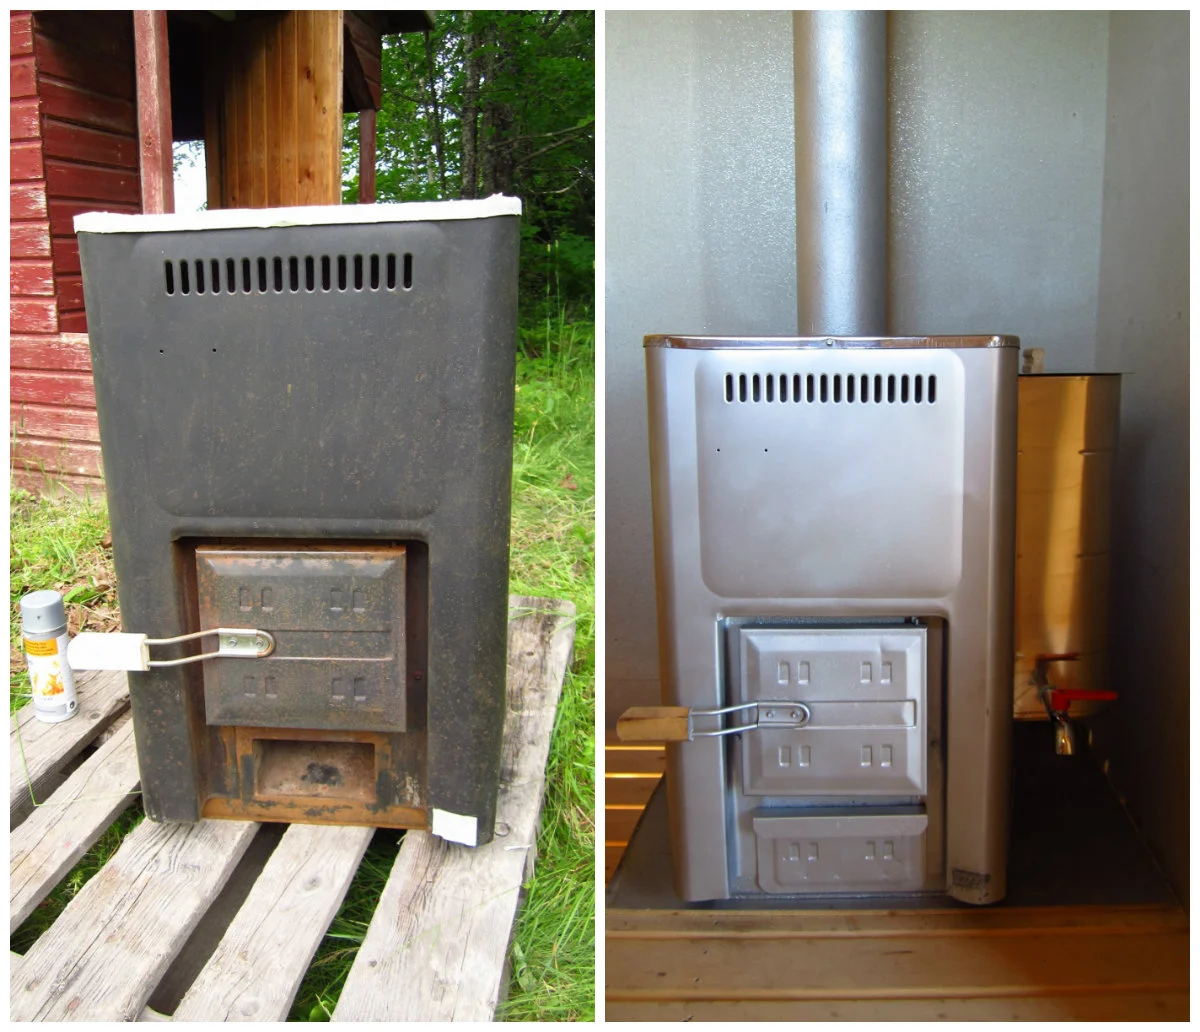
The chimney we also took from the old sauna on our property. I cleaned and painted it just like the stove.
There were still several aluminum parts we needed for the chimney installation, so all those I bought separately.
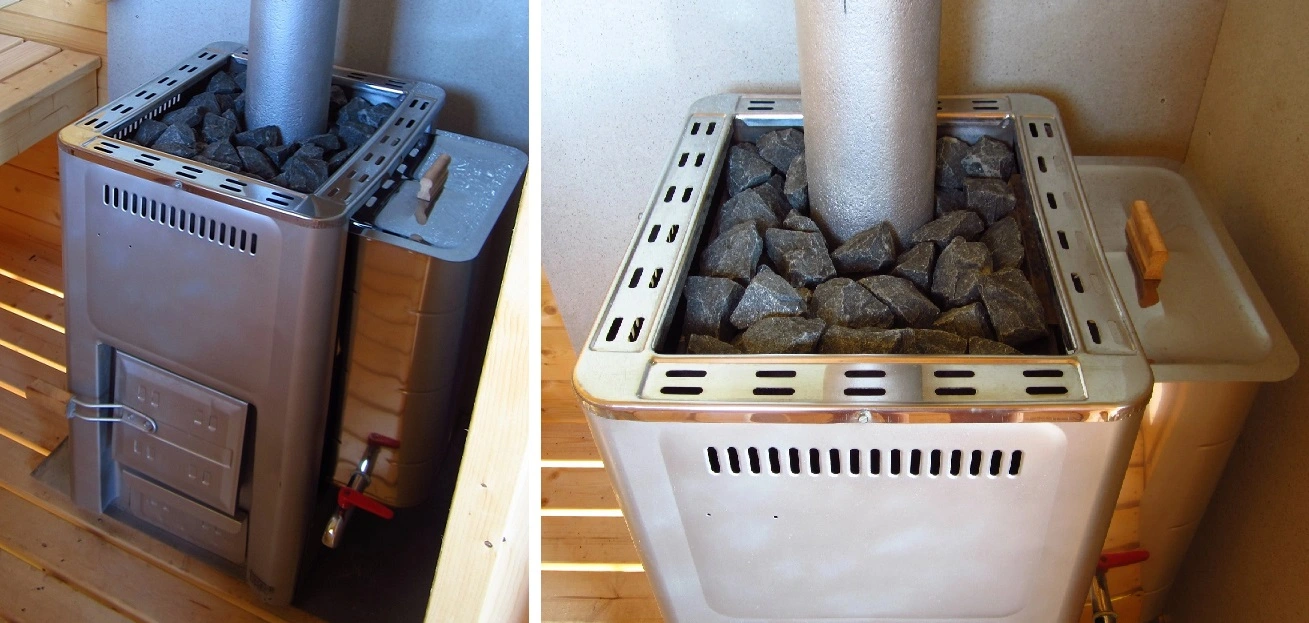
I also bought new sauna rocks made of vulcanite. Other proper sauna rocks would’ve been fine too, but I chose vulcanite for the color; black looked so much better than gray with a silvery stove.
Water tanks also cost extra, and you can find sauna kits with or without them. Depending on your situation, you may not need a water tank.
The hot water in a sauna water tank is meant to be mixed with cold water (that you’ve carried to the sauna from a lake or pond, for instance) and then used to wash your body. This is how it was done before showers became a thing.
This is still how it’s done in remote areas with cabins that have no running water.
But like in our case, the main house has a modern bathroom with a normal shower, so there really is no use for the sauna water tank.
Now our sauna was starting to look like it was ready for its first sauna session!
We installed the front door and window in the order they had to be installed; following the instructions was crucial as in our case, the sauna room door had to be installed quite early on while the front door and window came much later.
Finishing the deck was easy using impregnated wood that came with the kit.
Below’s the chimney and views pictured from the roof.
With the chimney (installation), the most important points are:
- that it’s straight and long enough
- protecting the wooden roof from the heat (that’s why the aluminum pipe is so wide)
- sealing everything carefully to avoid rainwater or melted snow leaking in

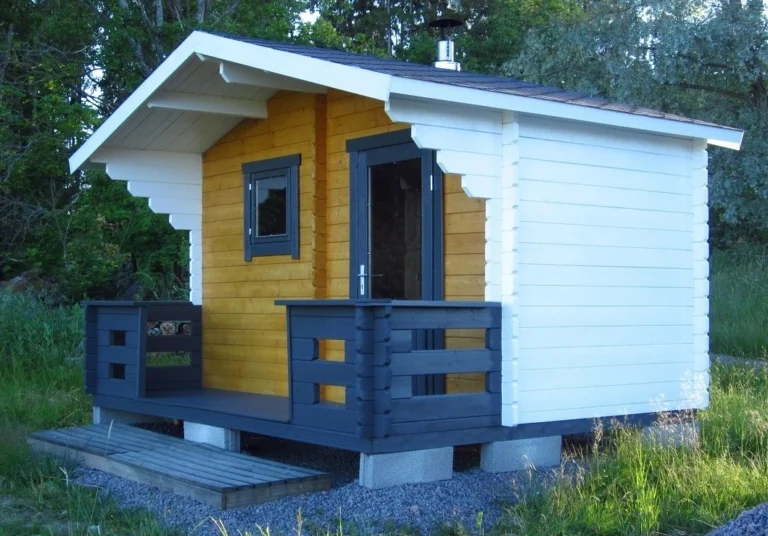
And that’s it for the entire build! Doable, right?
I also painted the exterior of our sauna simply to protect it from the elements but didn’t use any chemicals inside the sauna.
There are many natural, wax-based options you can use to protect sauna benches and walls, but it’s not a must.
Final Thoughts
Let’s conclude this post with a couple more end result pictures and remaining questions.
By now our sauna has been in use for so long that I can confirm everything has worked ideally.
If you were to take only two tips from this article, they should be lifting the sauna up with blocks of concrete and the slatted floor: few things are as important as air coming in and water getting out!

Frequently Asked Questions (FAQ)
1. 2- or 4-person outdoor sauna kit, which is better?
4-person kits like the one featured in this article are undoubtedly more versatile and not too big for 2-person households.
Very small saunas that are more like booths than sauna rooms tend to skimp on many things like sauna benches because there isn’t enough room. Certain activities, such as sauna whisking, also require more space.
Unless your budget forces you to buy small, I recommend getting at least a 3-4-person sauna. Then you’ll have the option of lying down too, which is a very nice bonus.
2. Can you put a sauna outside?
Outdoor saunas are obviously intended for outdoor use; it’s never a good idea to put an indoor sauna outdoors.
Also, avoid such “outdoor” saunas that are indoor saunas but with a roof (sold by some US sauna sellers); a simple roof isn’t enough to turn an indoor sauna into an outdoor sauna. A sturdier build and proper weather-proofing are required.

3. Can you keep a sauna outside?
If your sauna isn’t solid but is portable like a sauna tent, it depends on the model whether it can be kept outside. Portable options usually can’t survive storms and blizzards.
4. Can you build your own outdoor sauna?
Different countries, states, and residential areas have their own rules when it comes to building permits for saunas. Familiarize yourself with them before you start building.
In many cases with permanent structures, a permit is generally required in the US and Canada, for instance, but I’ve also come across examples where no permits were needed.
There are many exceptions, though, and even my own sauna, despite being built in the middle of nowhere, did require a permit.