Painting a Sauna: The Best 3 Reasons to Paint/Stain a Sauna
Can I paint my sauna is a question many sauna owners ask at some point.
While you certainly can in many cases, it would often make more sense to ask whether painting a sauna is something you should do.
When talking about an outdoor sauna and its exterior, then the answer is a definitive YES.
You should paint or stain the exterior of your outdoor sauna to protect it and to extend its lifespan.
With interior surfaces, however, or with indoor saunas in general, the answer is that painting them isn’t necessary and in many ways, not recommended either.
There are still some specialty stains intended for painting a sauna interior; they are for the aesthetics only and don’t improve the functioning or breathability of your sauna (but don’t fully clog the pores of the wood either).
In this article I’ll answer all your sauna painting related questions, regarding both exterior and interior painting, while introducing the paint job of my own sauna.
Having painted it years ago and repainted especially the front in 2024, I have many pictures and experiences to share.
3 Reasons Why Painting a Sauna Is Nearly Compulsory
As there’s so much false sauna information online, you may have thought painting a sauna exterior is something you shouldn’t even consider.
Especially in the US, saunas are believed to have such magical powers that they don’t even need a roof! And if your sauna doesn’t require a roof, why would it require paint or stain either?
(In reality, your wooden outdoor sauna does need a roof and paint/stain just like all wooden houses do if the goal is to get to enjoy them for as long as possible.)
So, should you paint the outside of a sauna? Yes. Let’s discuss why.
1. It adds years to the lifespan of your sauna
When your sauna is made of wood, it’s no different than any other wooden house. And what happens when you leave the exterior of a wooden house untreated?
It will weather and age prematurely, turning gray. That’s not the worst part, though, and some people actually like that gray look. But because the walls are not protected against the elements and humidity, untreated wood will mold and rot significantly faster than treated wood.
Once the wood has started to rot, no paint or stain can save it. In fact, some oil-based paints and finishes (such as linseed oil) can even further the decaying process because wood rot feeds on the nutrients the paints provide.
That’s why painting a sauna for the first time should be done when your sauna is still new, ideally right after it’s been built.
How do you weatherproof a sauna? By painting or staining it. Weatherproofing is exactly why painting a sauna is such a good idea in the first place; all the other benefits of painting are just nice bonuses.
While you can weatherproof a sauna tent with a rain cover or tarp, a wooden sauna needs weather-resistant paint that handles extreme temperature variations and contains anti-mold agents and UV protection.
2. It saves you money
Since a sauna is always a somewhat sizable investment, your money goes to waste if you let your sauna decay years or even decades before its time.
While you may have to replace your sauna heater every 10-15 years, you shouldn’t also have to replace the sauna building nearly that frequently!
Staining or painting a sauna will certainly be cheaper than having to buy a new sauna. Best sauna paint doesn’t have to cost any more than regular house paint.
If you’ve been wondering the cost of exterior painting for sauna, expect to pay no more than $80-120 USD per gallon of exterior acrylic paint.
3. It lets you choose the aesthetic or change the look
Painting a sauna allows you to match your sauna with the main house, which creates a harmonizing look that emphasizes your home and sauna go together.
This is helpful if there happen to be several other houses and sheds in the vicinity or on your property; if none of them match, the overall appearance can resemble a mottled patchwork quilt, which isn’t to everyone’s liking.
A matching look is often fresher and more modern in addition to being among the best exterior sauna painting ideas.
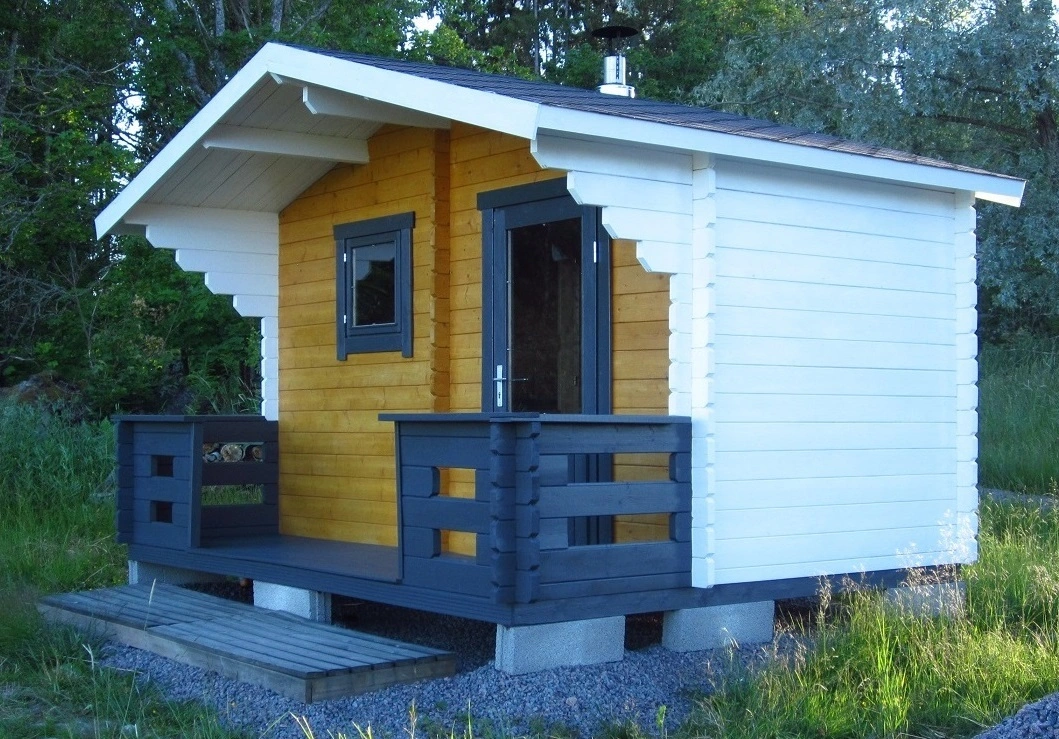
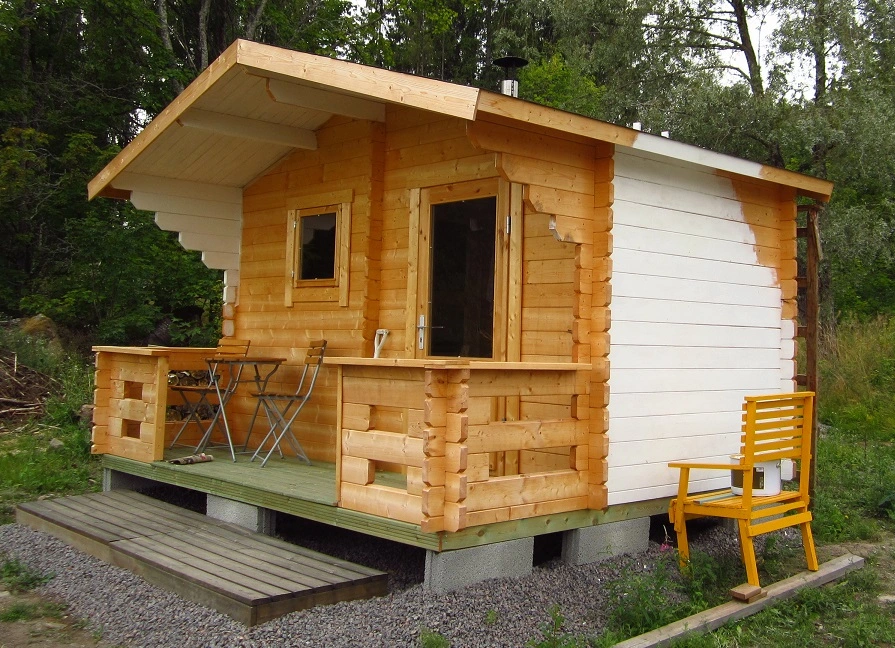
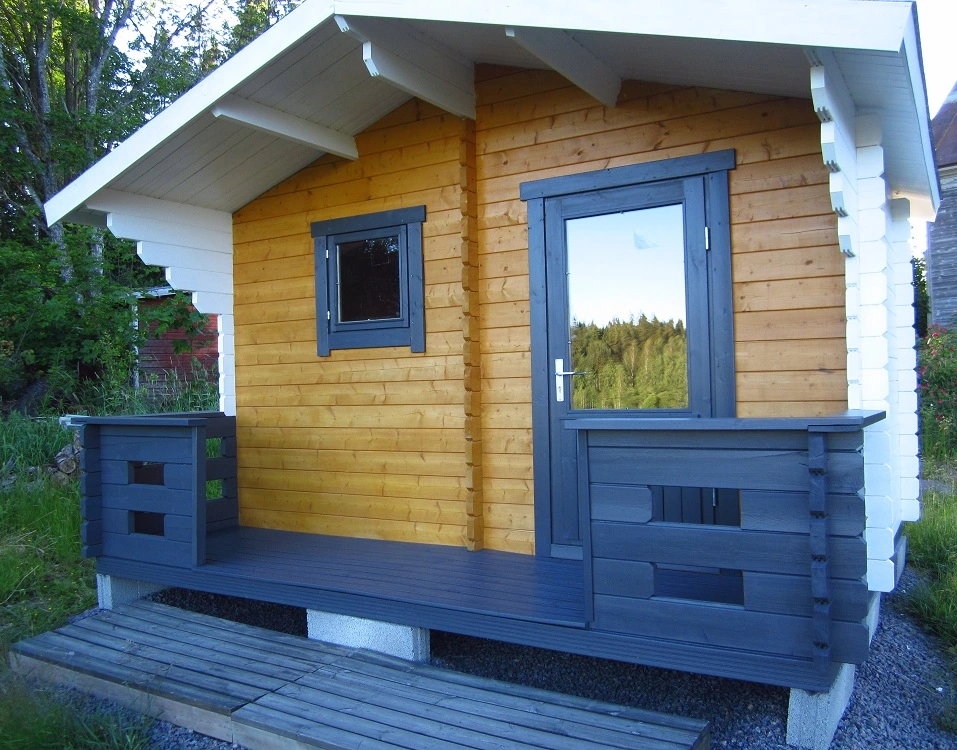
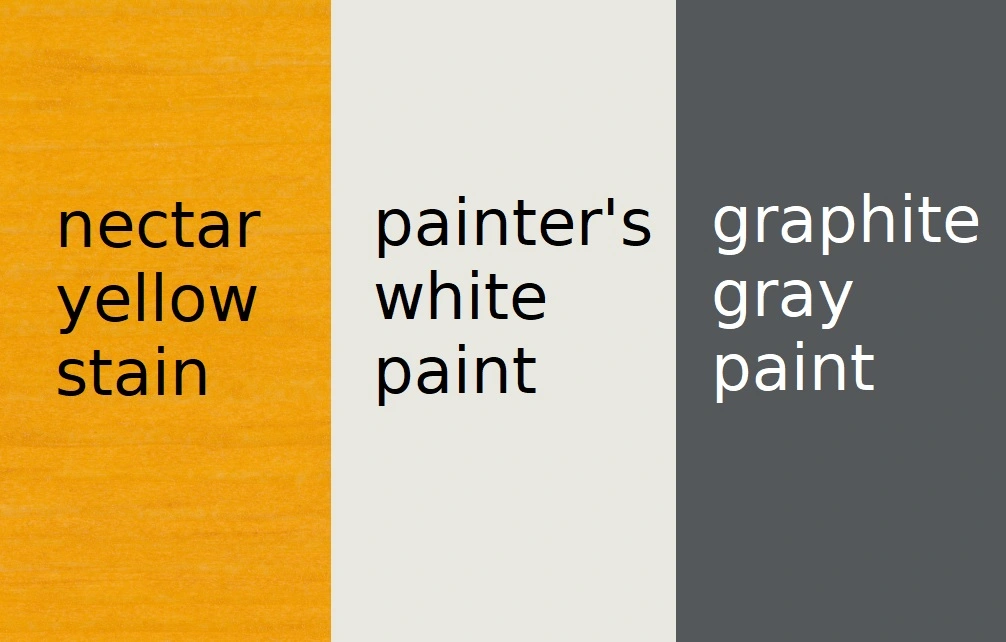
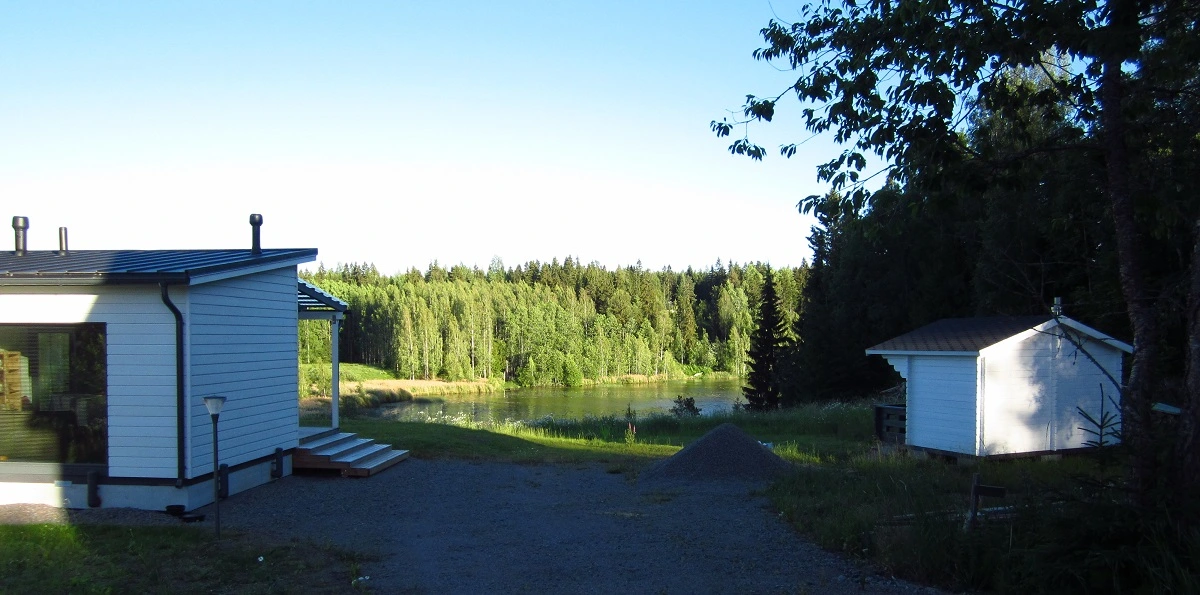
If you weren’t completely sold on the color scheme I chose for my sauna (yellow, dark gray, and white, and not in even amounts since most walls are white and only the front has yellow and gray), maybe it makes more sense now:

This DIY exterior painting for sauna looks so good because it matches perfectly with the colors of the main house. I painted the sauna completely myself, which took several days in total.
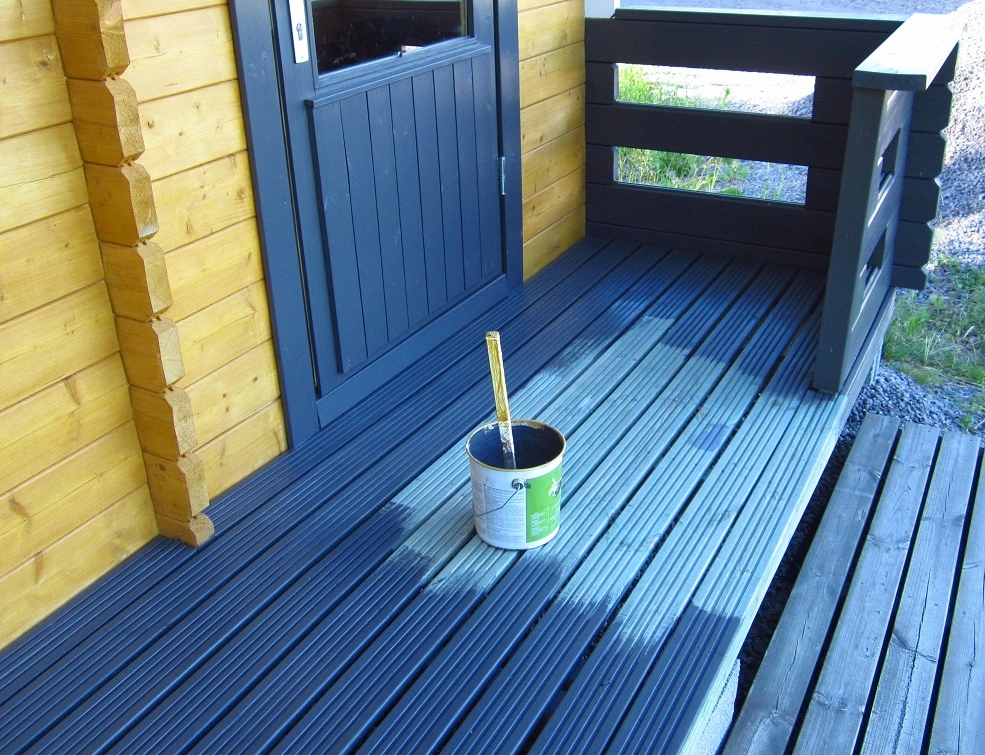
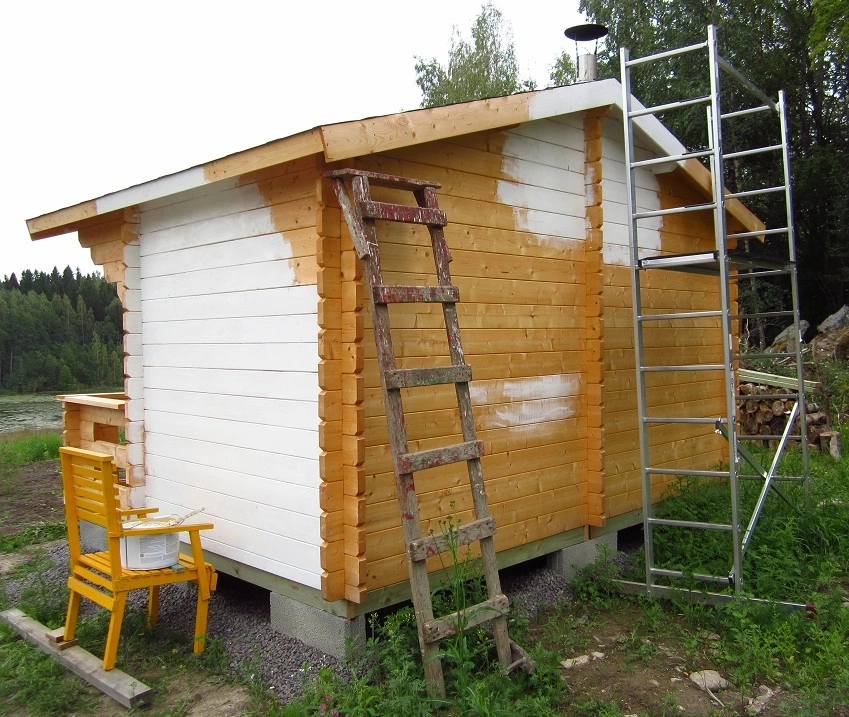
How to paint a sauna white? By applying the paint just like you would any color, but just repeating the process. Out of the three colors I used, white had the least coverage, so it was the only color that required two coats while yellow and gray needed only one.
Consider using a primer if it’s not included in the paint.
What makes outdoor sauna paints and exterior sauna stains so great is that, if you wish, they allow you to change the look completely once it’s time for repainting.
Or if you want/need to repaint your main house with different colors, you can do the same to your sauna, once again matching it with the new look of the main house.
Depending on wear, staining or painting a sauna every few years is enough; no other treatments are necessary.
How to Paint a Sauna? (Exterior Wood)
1. Unless your sauna is new, prep the surfaces: use sandpaper to remove old and stripped paint, wipe away dirt and bird poop, and remove cobwebs.
2. Choose a water-based acrylic paint (or stain) meant for exterior use and apply 1–2 coats for even coverage: you may find darker colors have better coverage, which is why one coat can be enough while white, for instance, requires two coats.
🎨 Using a brush instead of a sprayer gives you a more long-lasting result as the paint or stain adheres better, but using a brush also means more work and a slower process.
💧 The best time for painting is from late spring to late summer. In the north, August nights can already be too humid, meaning the paint won’t dry properly. Pay close attention to weather forecasts when planning your painting schedule: the relative humidity outside shouldn’t exceed 80% when painting a sauna.
🌧 After rainy days, allow the wood to dry at least for a couple of days before continuing with painting. If you paint wood that’s too wet, you will trap that moisture in, which will make itself known as peeling paint, possibly already next year.
📊 If you don’t want to do any guesswork, you can get a pinless, non-destructive wood moisture meter and take readings with it from various spots (ideal result is less than 14%; if it’s higher than that, it means there’s too much moisture in the wood).
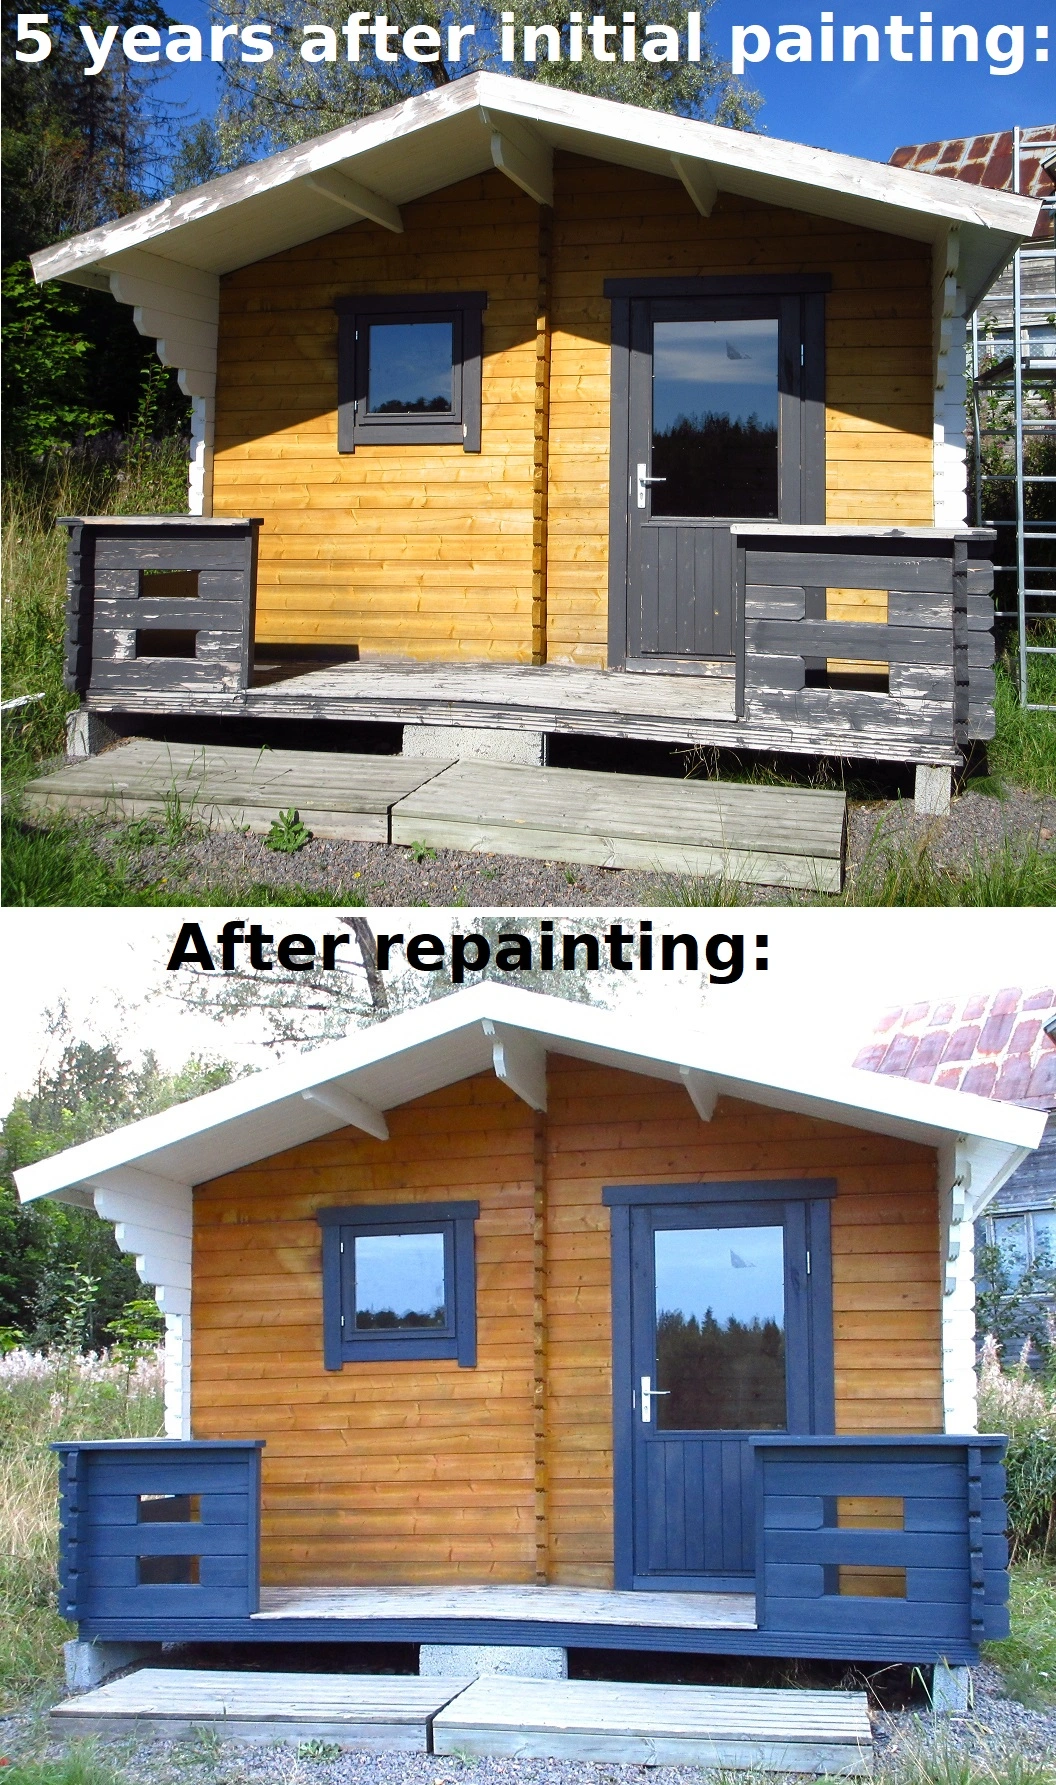
Above, you can see my sauna five years after I initially painted it, and then right after my dad and I repainted it in 2024. There are several things I want to mention here:
☀ My sauna front is south-facing, which means it’s maximally exposed to sunlight. Experts say it’s always the south wall that gives in first: when the summer sun hits damp wood, the wood dries so rapidly that micro-cracks start forming, later turning into larger cracks (Kaila 1997, p. 577). That cracking leads to stripping paint.
👍 So, while it’s realistic to expect the paint or stain to wear out and/or strip the most on the south-facing wall, you may find all the other walls need little to no repainting: that was the case with my sauna at the 5-year mark.
👎 When repainting a sauna, the actual painting part can be quite fast and nice; removing old paint by sanding it off is what’s most time-consuming and less fun. Don’t even ask me what I thought about removing old paint from the grooved deck boards!
🌲 Since the deck is made of impregnated wood, it doesn’t need paint to protect it. I had painted it initially but decided against it this time. I could’ve left it unpainted already years ago, but when the deck boards were still new, they had a greenish hue that clashed with everything, so I wanted to cover it.
✅ Now that the hue and initial paint is gone, I can treat the deck with the same wood oil I use for the main house deck. This also means the sauna and the main house match even better now, considering the main house doesn’t have and never had a dark gray deck.

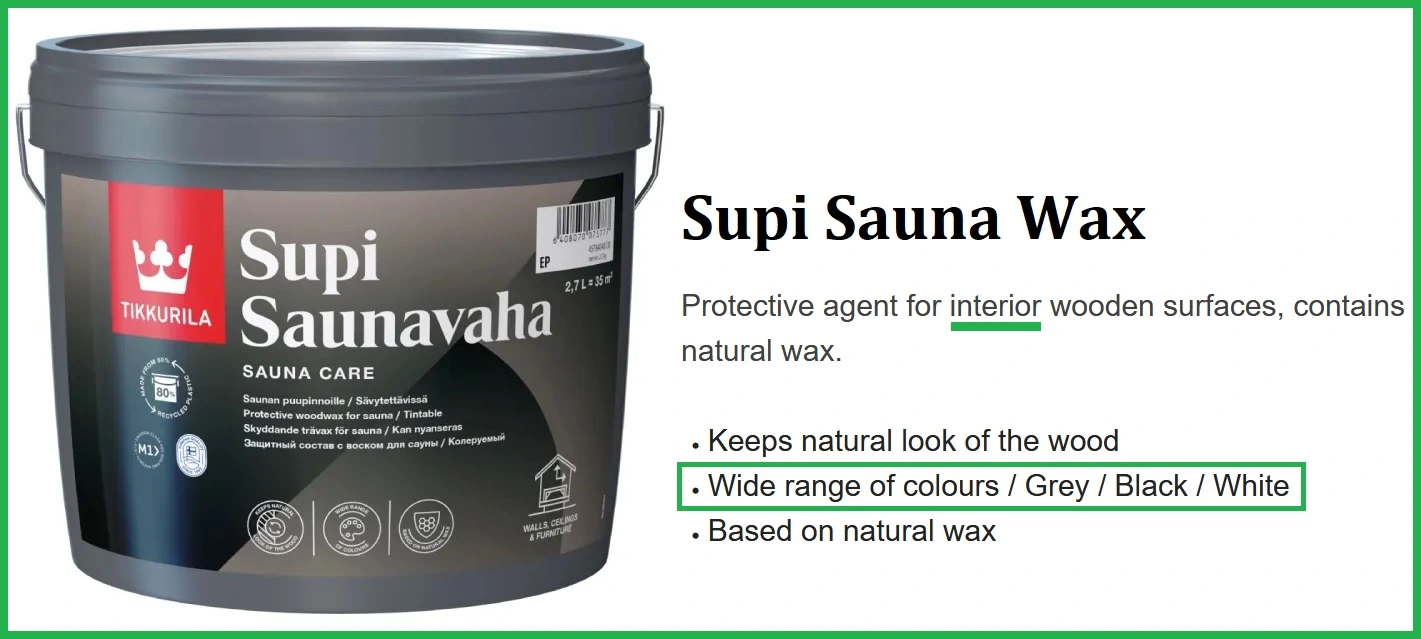
What about Painting a Sauna Interior: How to Treat Sauna Wood?
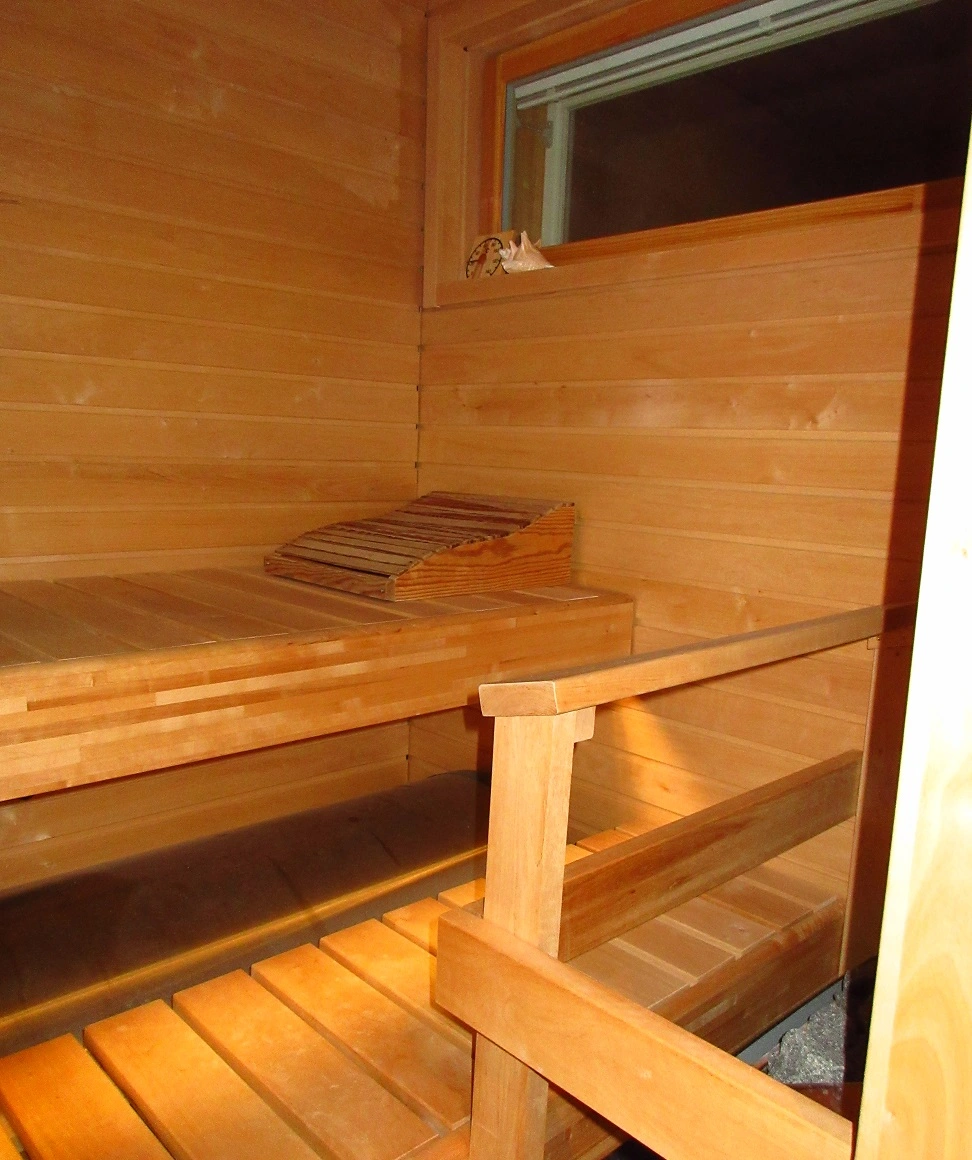
Your sauna interior, including the benches, walls, and the floor, doesn’t need to be treated in any way. This is a universally accepted truth, and even in Finland where sauna paint selection is the widest in the world, most sauna interiors remain unstained and unpainted.
(Some ready-made indoor sauna panels may have a natural wax coating, which is fine as it helps repel dirt, making cleaning easier.)
The main reason for leaving sauna interior untreated is breathability. Modern stains do allow the wood to breathe, but painting a sauna still never leads to better breathability than you would achieve without paint or stain.
How do interior sauna paints differ from other paints? They handle high temperatures without peeling off. They’ve also been tested to ensure there won’t be toxic fumes and chemicals released despite being used in a hot and humid environment.
There are people who want to treat interior sauna wood even though it isn’t necessary. These kinds of treatments are for the looks and extra protection.
If you want to treat interior sauna wood, here’s everything to consider:
🔶 Colors: ready-made sauna paint colors include black, gray, and white, but if you have wax-based products tinted according to your wishes, there are dozens of translucent colors to choose from.
Since all interior sauna paints are closer to stains than paints, the results can be patchy. Black has the best success rate, bringing the most uniform results and smoke sauna vibes.
🔶 Finish: matte or pearlescent. Painting a sauna matte is more popular and is achieved by wax or paraffin oil. Wax gives you a much more long-lasting result, lasting for years, while paraffin oil you have to reapply a few times a year.
If you want to preserve the color of the sauna wood, then your best choice is sauna wax. That won’t darken or deepen the wood’s natural color unlike oils that do deepen the color.
🔶 Color changes: If your sauna is already older and used, staining it is always more risky, especially if you wish to go from darkened surfaces to lighter or even white. The colors and shades may change, so it’s safer to test them first on the underside of your sauna benches, for instance.
Sometimes even a professional painter isn’t able to tell what went wrong with painting a sauna: gray has the biggest potential of turning surprisingly patchy while white can turn into a purplish shade.
🔶 Wood types: Light-colored aspen and spruce are the safest wood choices when your color demands are very exact. Their natural color won’t have an effect on the finished result when painting a sauna with stains and waxes.
Wood from other trees can affect what the stain actually looks like in the end because their natural color shines through the stain.
🔶 Sauna benches: Stained or tinted just like walls, either with water-based wax or alcohol-based stain. This kind of stain will adhere to surfaces that have previously been waxed or oiled. It may look more patchy than the same stain would on new wood.
Since benches get a lot of wear and are washed more frequently with water than the walls, it’s a good idea to use a finishing oil after staining them.
Paraffin oil is also suitable for benches, but you may have to repeat the treatment up to four times a year, which is quite a con. There are many pros too: paraffin oil is non-toxic, eco-friendly, and naturally mildew- and fungi-resistant, so it will keep the benches in great condition.
🔶 Wooden floor: typically not treated in any way, but when using oil, it creates a protective coating that also repels water and dirt, making it easier to keep the floor clean.
Avoid painting or varnishing the floor as treatments like these can make it slippery.
🔶 Preparation: Clean the surfaces. If they’re shiny (= film-producing products have previously been used), cleaning won’t be enough but you will need to sand the film off before painting.
Preheat and ventilate your sauna after all treatments before you start using it.
Frequently Asked Questions (FAQ)
1. What do you seal a sauna with?
You can weatherproof your sauna exterior by painting or staining it, but you shouldn’t seal the interior as your sauna needs to be able to breathe.
2. Which type of paint is best for exterior sauna walls?
While you can’t go too wrong with almost any paint meant for wood surfaces and exterior use, water-based acrylic paint is still the most recommended one for painting a sauna.
That’s because it’s durable, long-lasting, easy to clean, and produces little to no VOC emissions (volatile organic compounds present in solvent-based paints). It protects the wood from the elements, UV exposure, and molding.
The flexibility of acrylic paint is also a huge pro on sauna wood when compared to paints that form a harder finish: wood will expand when it’s humid and shrink when it’s dry, and if the paint of your choice doesn’t allow for this kind of natural movement, it will crack more easily.
If you prefer staining to painting a sauna, then an oil-based stain that’s still water-soluble (meaning you won’t need any other solvent besides water) is the best finish for a sauna.
This kind of product can also be called a water-based exterior wood oil or an oil-based water-borne stain, so don’t let the names confuse you: whatever the seller calls it, it’s an oily product that you can clean off your brushes with just water when the stain is still wet.
Stain lets the wood grain show but still protects the wood from humidity and sunlight.
3. Should you varnish a sauna?
Varnish isn’t the best as it can crack and the film it creates on top of the wood is usually thicker or at least denser than with acrylic paint that allows the wood to breathe better.
4. Can you paint the exterior of an infrared sauna?
Yes, you can. As infrared heat rooms are not real saunas, meaning the temperatures are low, and there is no steam/humidity (löyly) forming like in real saunas, there are very few limitations as to which paints are suitable.
You won’t be needing any special infrared sauna paints (they don’t exist), but can choose any (water-based) paint; if you have your infrared “sauna” indoors, water-based paint is ideal as it’s more odorless and easier to use than solvent-based paints that smell and require turpentine for cleanup.
If your infrared cabin is outdoors, just make sure the water-based acrylic paint you choose is meant for exterior use; paint like this handles temperature variations, UV exposure, and weather conditions unlike paints meant for interior use.

Final Thoughts
Staining or painting a sauna exterior will pay off when your goal is to protect your wooden sauna from humidity, mold, and damaging UV rays.
Matching your outdoor sauna with your home by using the exact color scheme of the main house is one of the most appealing choices when considering the aesthetic.
Painting a sauna interior, however, is done only for the looks, so if you’re happy with your sauna interior as it is, there’s no reason to paint it.
If you wish, you can use clear and natural sauna wax or paraffin oil if you just want extra protection for interior sauna surfaces and to make cleaning easier.
Just don’t confuse sauna wax with sauna finish (saunasuoja in Finnish)! That’s definitely the most debated sauna substance out there.
While Supi sauna wax (that I introduced above) can be great, the same can’t necessarily be said for Supi sauna finish or any other interior acrylic protective agent regardless of the brand.
This kind of product creates a plasticky film that blocks breathability fully if you apply several coats of it. It also makes the surfaces feel hotter and potentially sticky when applied too generously. It’s not meant for benches in the first place but is for the walls and ceiling.
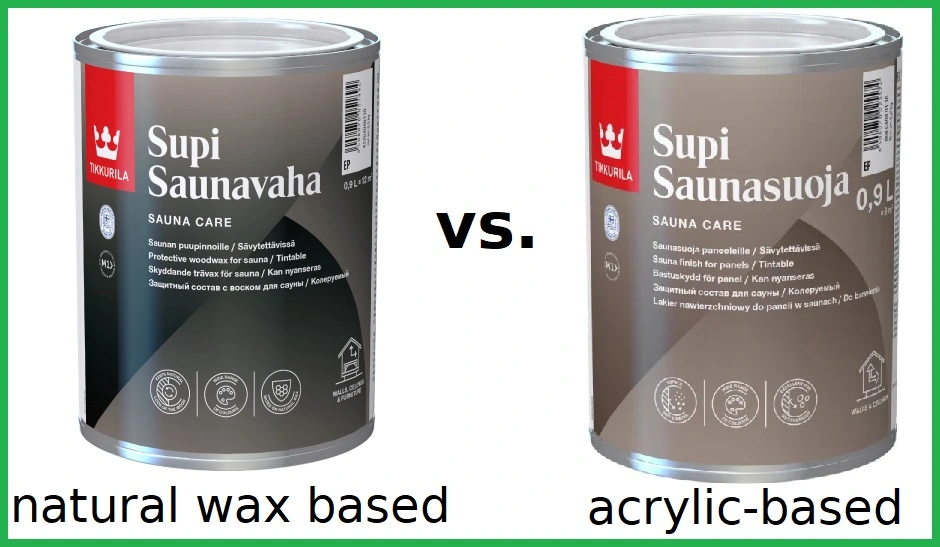
You might be wondering why I’m mentioning such foreign-looking products anyway, but since saunas come from Finland, the best sauna products also come from Finland and are sold in the US. The Supi line is the most known and sought-after where painting a sauna interior is concerned.
I personally bought Supi sauna finish as my intention was to protect the interior surfaces and prolong my sauna’s lifespan. I’m only interested in treatments that do my sauna a favor, not compromise its functioning in any way.
Before I opened the can, I had pictured sauna finish being waxy or oily, natural-feeling, and maybe even smelling good like beeswax. All that despite other reviewers saying that sauna finish is like glue. I didn’t want to believe the truth was that grim.
But once I opened the can, I had to believe it: acrylic sauna finish really is just like glue. It looks, smells, and feels like glue.
After this discovery, I didn’t want to apply it anywhere. And since so many people advice against it, including architects and painters, saying it can do more harm than good, I decided not to use it on any interior surfaces.
Although this product isn’t meant for sauna exterior, I applied it on the underside of floorboards because of the anti-mold agents it contains. I’m sure I could’ve left that undone too, but I didn’t want the whole can to go to waste, and since outer surfaces are susceptible to mold in a completely different way than interior surfaces, I gave it a go.
I will take close-ups of those floorboards sometime in the future!
Book source:
Kaila, Panu (1997). Talotohtori: Rakentajan pikkujättiläinen.